How can we import / copy and manually delete pictures and videos (iPhone Photos & Videos) from iPhone or iPad on Windows 10
iPhone and iPad were designed for maximum compatibility with all Apple devices. Therefore, because a possessor of Mac OS X sa transfer photos and fimlulete made with iPhone or iPad on the Mac, it's a breeze. To import photos from iPhone or iPad to Mac, the user does not have to do anything. They are imported by themselves if the "My Photo Stream" option is activated in the Photos application on the Mac.
Finally, we will not be referring to Mac users today, but to Windows users who want to import and delete photos from iPhone or iPad using Windows 10.
How to Manually Import Photos and Videos from iPhone and iPad to a Windows 10 PC
1. First of all, we will have to establish a connection between the computer or laptop with Windows 10 and the iPhone or iPad. We connect the data cable of the iPhoneacquis in USB slot al laptopacquis, then homescreen- the iPhone we accept for Windows system access to the photos and video files on the iPhone.

2. Allow this device to access photos and videos? Of course, that's all we want to do. Let's access the media files stored on the iPhone or iPad from Windows. Allow.
Once we accept, messages and dialog boxes appear on the Windows screen that help us to import photos and videos taken with the iPhone as easily as possible. From here we have several options for importing photos & videos. Either use the help dialog boxes and import the pictures and movies with the help of a photo manager application installed on Windows. Picasa or Windows Photos, or browse by yourself in the iPhone or iPad folder where the photos are stored.
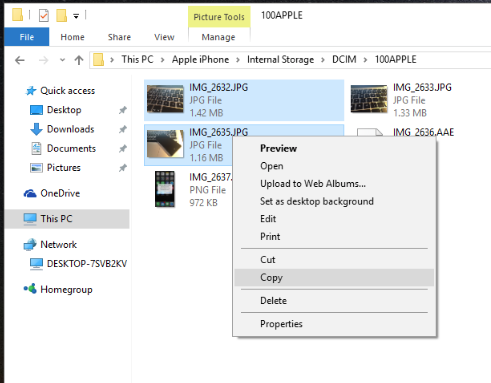
Manual copying of photos and video files taken with iPhone or iPad, directly from the storage space
Browsing and copying directly from the storage drive of the iPhone or iPad seems to be the easiest method for many users. This is done very simply. after connecting the iPhone to the Windows PC, navigate to This PC > and below Devices & Drives open Apple iPhone.

In drive Apple iPhone access the Internal Storage > folder DCIM and then manually copy the folders or photos and firms are facing here. Usually in DCIM folders with gender names are created "100APPLE"
"Easter" wherever you want to store on your computer or laptop the pictures and movies taken with iPhone or iPad.
Importing iPhone / iPad Photos & Videos using a photo application installed on Windows 10
Most Windows photo editing and management applications also offer media import support from external devices.
When the we connect an iPhone or an iPad to Windows 10We are asked by a dialog boxes what action we want to perform for the connected device.

Click on this dialog box, then choose the option that interests us. In our case, we interesaza to import photo and video files.

So we choose the first option from the quick menu. Click on "Import photos and videos" using the application Photos Windows 10.
Choose Photo and video files to import interesaza us on Apple iPhone, then click on “Continue".

We are asked once more if we want to start the import and if after the pictures and video files are imported, we want to delete them on the storage space of the iPhone or iPad.

Click on “Import” to start copying photos and videos from your iPhone to your Windows 10 laptop / PC.
That was all! :) Choose the option “Delete imported items from Apple iPhone / iPad after importing” only after you are sure that the photos and videos taken with the iPhone have a backup copy made in a cloud service, such as iCloud Photo Library, OneDrive, Dropbox or Google Photos.


